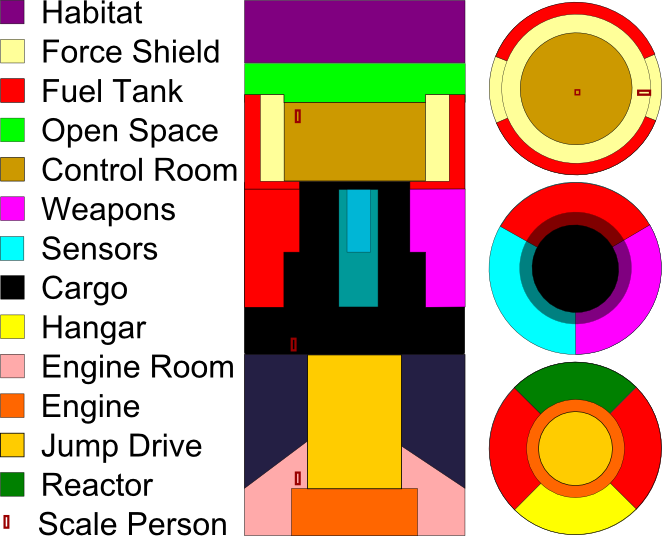
| Front Hull | System | |
| [1] | Armor, Steel (dDR 5) | |
| [2] | Light Force Screen | |
| [3] | Habitat (6 luxury cabins, 4 cabins, 1 establishment, 1 sickbay, 4 hibernation chambers) | |
| [4] | Open Space (2 areas) | |
| [5] | Cargo Hold (150 tons of cargo) | |
| [6] | Habitat (14 cabins, 3 bunkrooms, 1 lab, 1 office) | |
| [core] | Control Room (Complexity 11 Computer, 6 Control Stations) | |
| Center Hull | System | |
| [1] | Weapons, Medium Battery (Improved VRF UV laser, 2 uninstalled, 100t of cargo) | |
| [2] | Enhanced Sensors (Sensors 11-) | |
| [3] | Defensive ECM (-2 from Attacks) | |
| [4] | Hanger Bay (100 tons of space) | |
| [5] | Weapons, Tertiary Battery (30MJ tractor beam, 16 cm gun, 24 cm launcher, 27 uninstalled, 135 tons of cargo) | |
| [6] | Cargo Hold (150 tons of cargo) | |
| Rear Hull | System | |
| [1] | Cargo Hold (150 tons of cargo) | |
| [2] | Cargo Hold (150 tons of cargo, 50 of it refridgerated) | |
| [3-4] | Standard Reactionless Engines (2G acceleration) | |
| [5] | Engine Room (2 workstations) | |
| [6] | Jump Drive | |
| [core] | Fusion Reactor (2 power points) | |
This is a Streamlined craft, with Wings. It's full crew compliment is 8, and a few attendants to take care of passengers.
| TL | dST/HP | HT | Hnd/SR | Move | SM | LWt | dDR | Occ | Load | Cost |
| 11 | 100 (10) | 13- | -1/5 | 2G/c | +9 | 3,000 | 5/0/0 (100) | 60 | 935 | $186,125,000 |
Defensive ECM is probably useless, replace with cargo hold if necessary and/or add armor back with that money. Advanced Metallic Laminate would keep the price around the same (~174mil). Alternatively, just replace with nanocomposite or even diamonoid - evasive action allows the pilot to 'choose' what section is targeted, we will probably want the central section to be targeted.
Once we get extra money for upgrades, the first one should *definately* be an antimatter reactor.
Notes and Suggestions:
Tiarynn (13 May 09): swap the enhanced sensors with the forward cargo bay. Stops someone from spacing the passenger areas.
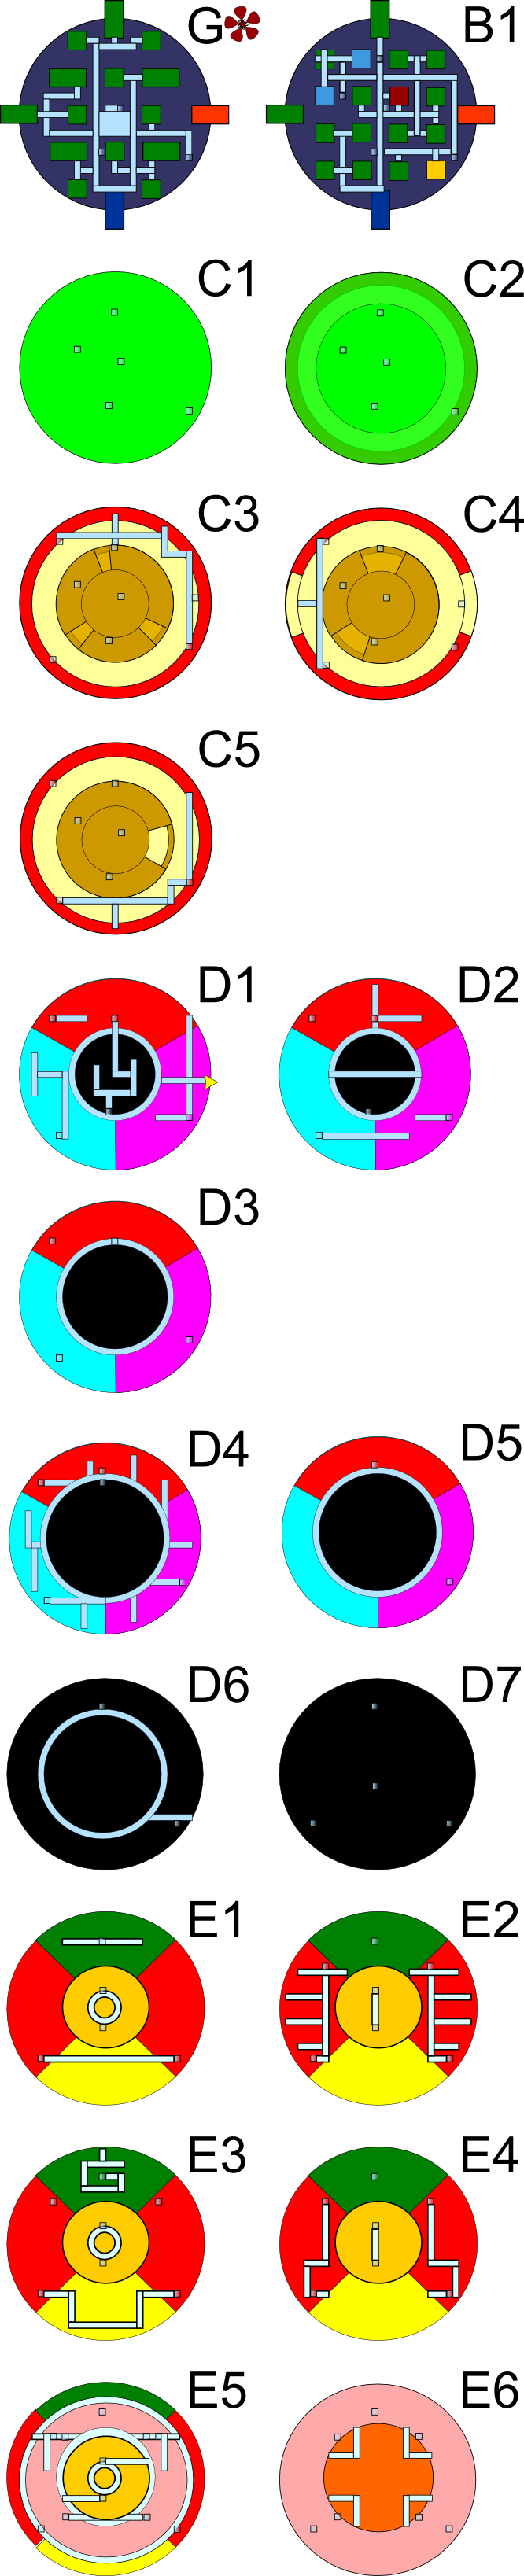
G* - General Deck. The front of the ship is mostly capped with large rooms where a view of space in front of the ship is available. Two 'corner' luxury rooms are available, the other four luxury cabins and four of the regular cabins having portholes that provide a side view of space.
The ships lab and the bar also corner rooms.
B1 - If G* is the ground level, B1 is the first 'basement', second habitatation deck. On this floor lie additional cabins, including the bunks and hibernation pods. Some view of space is visible from most of the cabins, even the ships' office has a narrow porthole pointing towards the front of the ship.
Life support for the habitat is dispersed through the unused portions of the G and B decks. It is mostly self contained but while there are a few hidden access shafts most maintnance must be done in plain view.
C1 - this 'deck' consists entirely of open air and railing for the ships lifts. While in free-fall most of the lifts 'hang' from the top of C deck, moving off to the side so that the railing can be used to move from place to place. Additionally large fans blow air down from the habitat decks into this section where the gardens can assist in life support. This airflow flows until it reaches D-deck, where the flow stops due to emergency pressure hatches.
C2 - The 'ground floor' of the Cherry Blossom's open space, it consists of a large sunken pit surrounded by a raised area which are used for farming.
C3 - The 'Bridge', first level of the command deck. All duty stations are on the first deck, though it takes great advantage of the 3-Dimensionalism. Sculpted white metal smoothly flows around large gaps in the floor where the bottom level of the control deck can be seen.
C4 - Second level of the command deck, this level is filled with support equipment for the bridge and backup crew positions. The dipole of the force screen pierces through the layer of hydrogen tanks here. Access tunnels permeate the systems at different levels allowing access for repairs. Additionally a number of unused freight elevator shafts pierce this layer as the open space segments were once cargo areas. Both the maintnance shafts and the freight elevators are hazardous to use while the force screen is active.
C5 - most ship systems related to the control room are contained in this deck, including the main core of the computer. Cyrogenically cooled, this deck is the coldest on the ship. If it weren't for warm air blowing in from above. A crucial segment of the force screen is also exposed.
D1 - D-deck is mostly the cargo hold, however it also contains a weapon system, the secondary fuel reserve and the science scanner system and astronomical research facilities. Unique to D1 is a catwalk overlooking the rest of the cargo hold. Steerage is actually stored between C and D decks, so that passengers can easily access their cargo while in flight.
D2- Contains the floor of the first part of the Cargo Lift; when all lower D-decks are emptied the cargo bay is capable of telescoping down to provide quicker unloading.
D3- This deck is wholly unremarkable.
D4- Access corridors for maintnace to systems on D3-D5 decks are here.
D5 - the second telescoping section. D6 and D7 must both be emptied for this section of the cargo bay to lower.
D6 - pure cargo area.
D7 - Bottom floor of the cargo bay. Provides hatch access to engineering.
E1 - Upper Engineering is divided into five parts - two fuel tanks, the fusion reactor, the Hangar bay, and the Jump drive. Of these only the hangar bay is open space. The reactor core can be lowered into engineering for major repairs, but access conduits allow easy maintnance without posing a radiation hazard. Being in the jump drive access conduits, o nthe other hand, is extremely dangerous.
E2 - This deck has access tubes for routine inspection of the fuel tanks and lines. A large part of the ships distrbuted processing power is also here for easy access to cyrogenic cooling.
E3 - Access to the reactor's heatsink reqiuires a complicated network of tunnels but it can actually be entered when it is sufficently cooled. The hangar bay has a retractable arch in this area to allow easy overhead repairs of ships while in gravity.
E4 - Inspection areas for the fuel pipeline system are on this deck. Fuel is piped directly from these systems into the engine core.
E5 - Upper level of Engine Room. The lower part of most systems can be accessed from here. It also contains a large amount of open space so that the engine, jump core and reactor can be dissasembled and repaired. Direct access to the hangar bay is also possible. A network of catwalks fill that space otherwise allowing easy access to other systems. Control panels for monitoring engineering, directing automated maintnance, and manual flight control are on this deck.
E6 - access conduits to the engine are on this level. Storerooms for diagnostic equipment and workshops are at the outer rim of this area, below the fuel tanks.
E7 - Ground floor of engineering. In the ideal it would be empty but realistically it is often partitioned into seperate sections using temporary dividers to provide 'working space' for repairs.
 Stryck Wiki